


A cake addict.
The last time I checked there was no cure. I admit, I don't check often.
Oh well.
When there is no cure, I deal with it by making and eating more and more cakes.
Oh well. Oh well. Such is life.
I suddenly realized that I have never shared "behind the scenes" footage of decorating an actual cake with you.
I have failed you. Addictions do that kind of thing.
Today I remembered. Are you ready?
If you think you can, you can. "I" know you can. "I" believe in you.
We shall begin at the decorating stage. Therefore, the cakes have been baked and the buttercream has been made.
A little insider info for you...
I bake my cakes in three pans instead of two. Today, we will be using three 8" pans of cake. I use 2 -
2-1/2 cups of cake batter per pan so the completed cake will be at least 4" tall. I like "BIG." I am sure you do too.
My standard amount of buttercream contains one pound of butter and two pounds of powdered sugar, along with flavorings and liquids. I normally use all but one cup of the buttercream for an 8" round, 3-layer cake.
Don't even think about the fact that the icing alone contains one entire pound of butter. Just forget that part and let's move on. Part of the addiction, remember?

Get the stuff ready. Cakes, icings, tools, cake board, measuring cup, icing bags, cake leveler and on and on and on. Lots of cake tools.
Hello. My name is Donna and I am an addict. A cake tool addict. Shhhhhhh.

I made the buttercream a few days ago so we need to put it back into the KitchenAid to fluff it up.

Fluffed. Check.

Fill a piping bag with chocolate ganache in order to make a "dam" to hold in all the buttercream. No oozing, wrinkles, sagging or bulges allowed on the final cake.

Trim up the cake to make it level.

Oh no. The "cake scraps" pile is is happening. Go ahead and eat yours. I will wait. I know how it is.
I am not going to eat mine this time. Promise. If I get wigged out on cake scraps, you will never learn how to decorate a cake. I am going to be strong today - just for you, my CAKIE friend.

Pipe a chocolate ganache dam with a large round tip. Plop down 3/4 cup of buttercream on top of the first layer of cake.
I know the ending to this story so if you eat an additional 3/4 cup of buttercream at this point, you will not have enough to finish the cake. You will have to make more. I know. I am the author here.

Spread it out. Keep it smooth and level. You don't want a wop-sided-leaning-tower-of-Pisa-cake, do you? Absolutely NOT allowed.

Repeat.

Smooth and level, remember?

Place the final layer on top.
It's time for a trim. We are going for "round and straight."

All trimmed up, straight and level.
Place a "kitchen level" on top of the cake just to make sure. Sometimes "eyes" can be deceiving.
Brush the crumbs onto the plastic wrap with a pastry brush. "Sam the Can" loves these. The "cake trimmings" are not as tasteful as the "cake scraps." Trust me on this one.
What? You ate some anyway. You didn't like them? Duuuuhhhhh. The trimmings are the driest part of the cake. You got choked? I will wait for you while you chug a glass of water. I bet you won't eat them again, will you?
Ready to get back to work now? Geeezzzz.

The cake scraps are calling my name. "Donna, Donna, Donna." I had a moment of weakness but I promised to stay strong - just for you.

Apply the crumb coat. It takes approximately 3/4 - 1 cup of buttercream. Don't use the term "dirty iced" here. That doesn't sound very nice, does it? I. Don't. Like. It.
Allow the cake to "settle" for several hours. Like, at least 2 or 3 hours.
Once it settles, chill it in the fridge for 30 minutes.
I think I forgot to mention that you need to have lots of patience.
In the meantime, remove 1 cup of white buttercream from the mixing bowl and set aside. Add a few drops of lime green color to the mixing bowl and mix it up again, baby!
We are back on track now. Rolling right along!

Apply the first coat of buttercream.

Keep going….

First coat. Check.
Chill the cake in the fridge for 30 minutes. Then just wait for it.

Apply the second coat of buttercream. This is how to get really thick buttercream on the cake - by chilling it between each coat.

Second coat. Check.
Ice it smooth with a bench scraper.

Combine some chocolate ganache with the white buttercream to lighten up the color a bit for the bike trail. Fill "another" bag.
Uugggg. I hate cleaning piping bags.

Use a toothpick to mark where the trail will go.
Place some cake scraps on the trail for hills and jumps. What? You ate all of your cake scraps already? Then use something else for the hills. Maybe a half of a cookie, pretzel or whatever you have
Pipe the trail onto the cake using the "basket weave" piping tip.

Use the opposite side of the basket weave tip and apply a chocolate border. This will balance out the cake design. Use the spatula and smooth it down a bit.

Make some darker green buttercream so the grass will pop. Add a tiny bit of "moss green" color to the lime green buttercream.
Geeeezzzzz. Another piping bag to clean.

Pipe the grass along the trail with the large grass tip.
Notice the darker spots along the trail? I added chocolate ganache to give the trail some character. I applied that with a spatula. No more piping bags for me today. Three is my absolute limit.

Add a little grass to the border. Sorta brings it all together, doncha think?
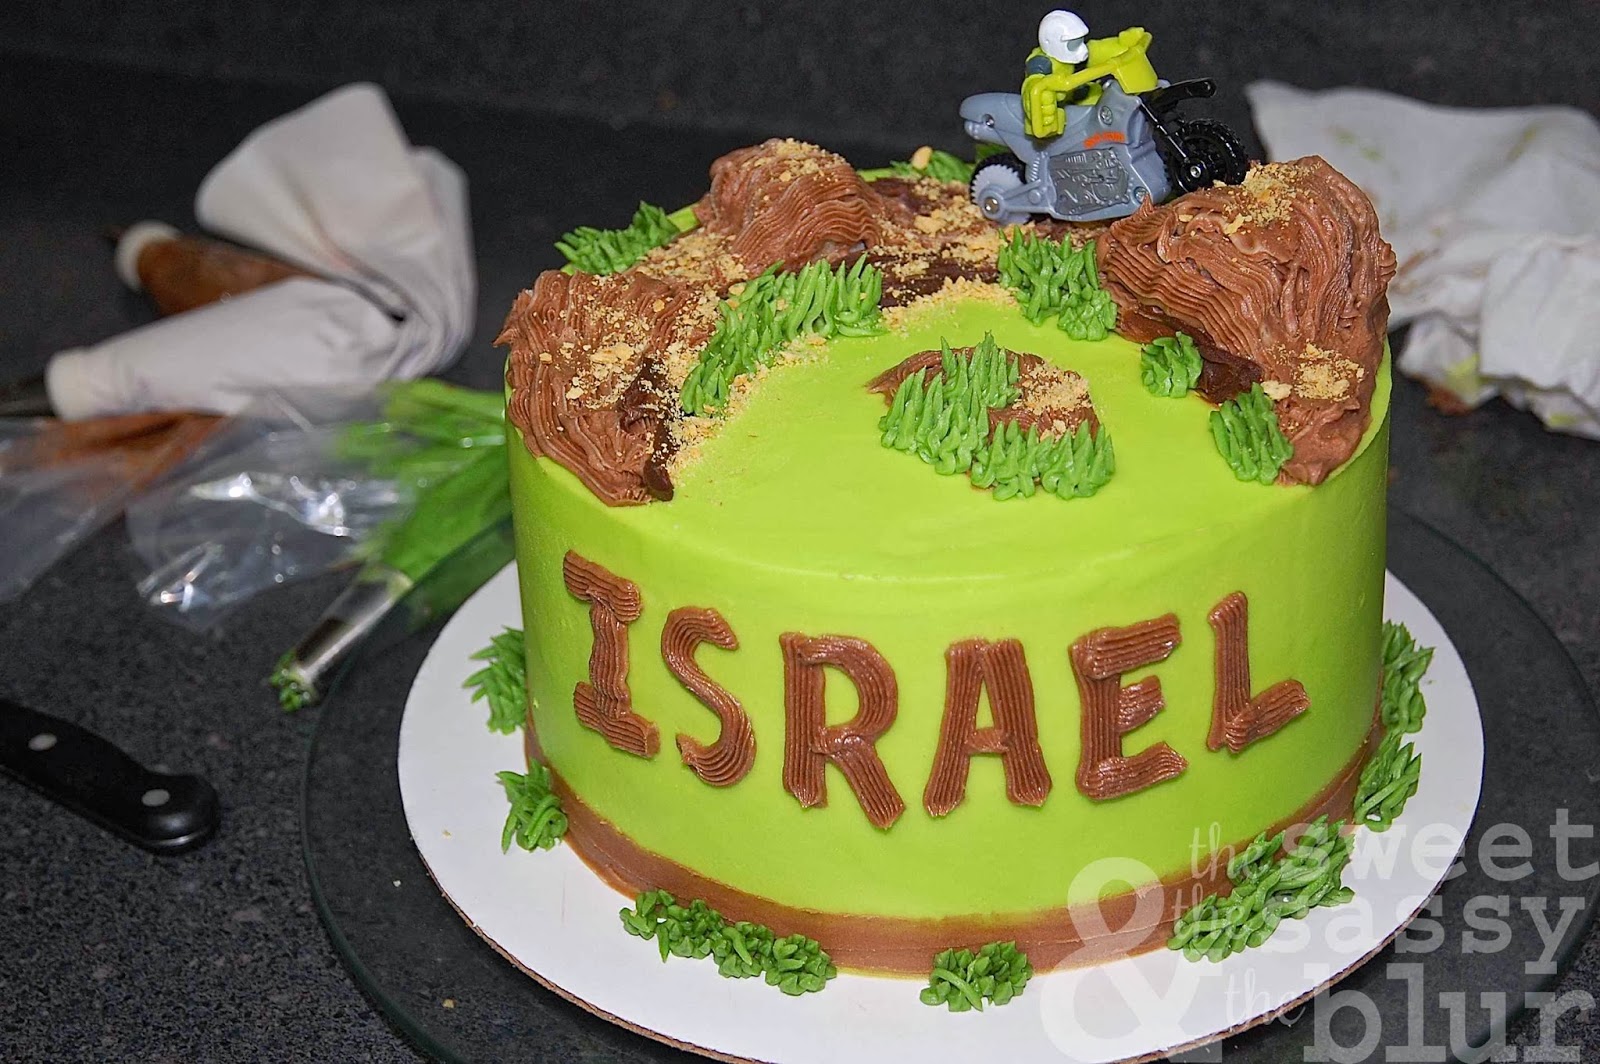
Crush up a graham cracker and make some "dirt." Sprinkle it on. Oreo cookies would have made better dirt but I didn't have any
Hmmmmm….should we write "Happy Birthday?" No. Not this time.
Pipe the name onto the cake with the basket weave tip. The same tip we used for the trail.
I think we are finished. What do you think? Does it look okay to you?
See, I told you. If you think you can you can!

Three piping bags to wash. I hate this part the most.
I know you probably like this part. You are going to sneak into a closet to suck down the left-over buttercream like a sucking a milkshake through a straw, right? Go ahead. I won't tell. We are in this together.
YOU may need more help with your addiction than I do with mine. I just love those judgmental people, don't you? NOT.
Plus...

A sink full….. Uuugggg.
Do you know that I have seen pics of really pretty cakes online and the background in the photo was the cake mess? Don't do that. Either clean up your mess or move it to the side. You have worked too hard on the cake - take a nice photo.

Now we need to take the cake outside to get some good pics in natural light. I took about 20 photos at different angles in 12F weather. Buurrrrrr.
I used a white background but I didn't like it. The dirt bike helmet got lost and the photo was just dull looking.
Back to the drawing board.
Black is much better. After another 20 or so pics, at different angles, I got a decent one.
Being a perfectionist causes pain sometimes. My hand were numb from the cold.
My cake scraps? I was strong today just for you. I gave them to "Sam the Can" to eat. If you would have been here, I would have given mine to you. I am like that. I understand when addiction is raging.
My piping bags? They found a nice home in the sink for the following four days. I know, I know, you cleaned yours out immediately. I remember. Don't rub it in.
And with that CAKIE ADDICTS "it's a wrap!" We had fun, didn't we? Crazy fun! Crazy filled fat fun. I hope your wore expands pants. Remember, no zippers, buttons or hooks allowed here.
Other tutorials?
Make some fondant leopard spots.
Easy peasy piped roses.
Reese's Peanut Butter Cake.
BIG Love,
Donna
xoxo

Loved this tutorial!. I love your blog and your pictures! I like to take pictures of nature and living things like children and animals too.
ReplyDeleteYour momma has two smart and beautiful daughters...but you got it from her cause she's beautiful too and I am serious about these commendable comments.
I have learned a little about cake decorating that I didn't know when I use to do some for my family, but they turned out okay. I know what you mean about the left over icing. I sure is good but I get too much of a sugar high from getting the stuff on my fingers and can't eat much of the left in the bags. I don't decorate cakes anymore because my wrists won't take all the squeezing needed to get the icing just right on the cake. I only baked for my family and grand children. They always loved them. I have damaged my hands through being a farmer and a farmer's wife. We grew everything we ate,,,just about, even down to the beef and pork. He butchered the beasts and I was the packer and wrapper.in getting it in the freezer. Sure do miss all of that fresh canned produce and home grown meat. Nuff said about our being foodies.
I made a really cute little mouse cake for my youngest grandson for one of his birthday parties. He loved Stewart Little, so I took my round stainless still bowls out of the cabinet and decided I would try my hand at doing one last decorated cake just for him. I used white icing, of course and the bowls were two different sizes so I used them for the head and body. I used iced vanilla wafers for the ears with pink icing on the front side of the ears. I made him a little pink nose and stuck a half eaten cookie in the place where his mouth but I promise I didn't bite it off, I broke it and then ate the other part of the cookie. I know what you mean about spandex and comfort and eating all of those scraps from the cakes. I had some plastic beading thread so I cut some of that to use for the whiskers. Jack loved the cake and was amazed by the realistic whiskers. It really takes someone with a sense of humor and imagination to make the cakes like you and other people like you do. If I could go back and have a do over, I might have went into the business but I really enjoyed being a farmer's wife who also worked for your mom and in sewing factories. I don't think decorated cakes were in demand as much as they are now anyhow. Soooo with back problems and tired old hands and not getting any younger, I leave the decorating to people like you. That way, I don't have a mess to clean up either.
Keep up the good work, MEM
I forgot to say that I baked the cakes in the two bowls LOL
ReplyDeleteYou are too funny! I LOVE cake, too. I also love making them. But, you do such an amazing job. So flawless! I love all of the steps you showed ...and the sink with all the dirty dishes. That made me laugh because that is the LAST part I ever get to. So not a favorite part of being in the kitchen. Have great Monday!
ReplyDeleteYou are too funny! I LOVE cake, too. I also love making them. But, you do such an amazing job. So flawless! I love all of the steps you showed ...and the sink with all the dirty dishes. That made me laugh because that is the LAST part I ever get to. So not a favorite part of being in the kitchen. Have great Monday!
ReplyDelete